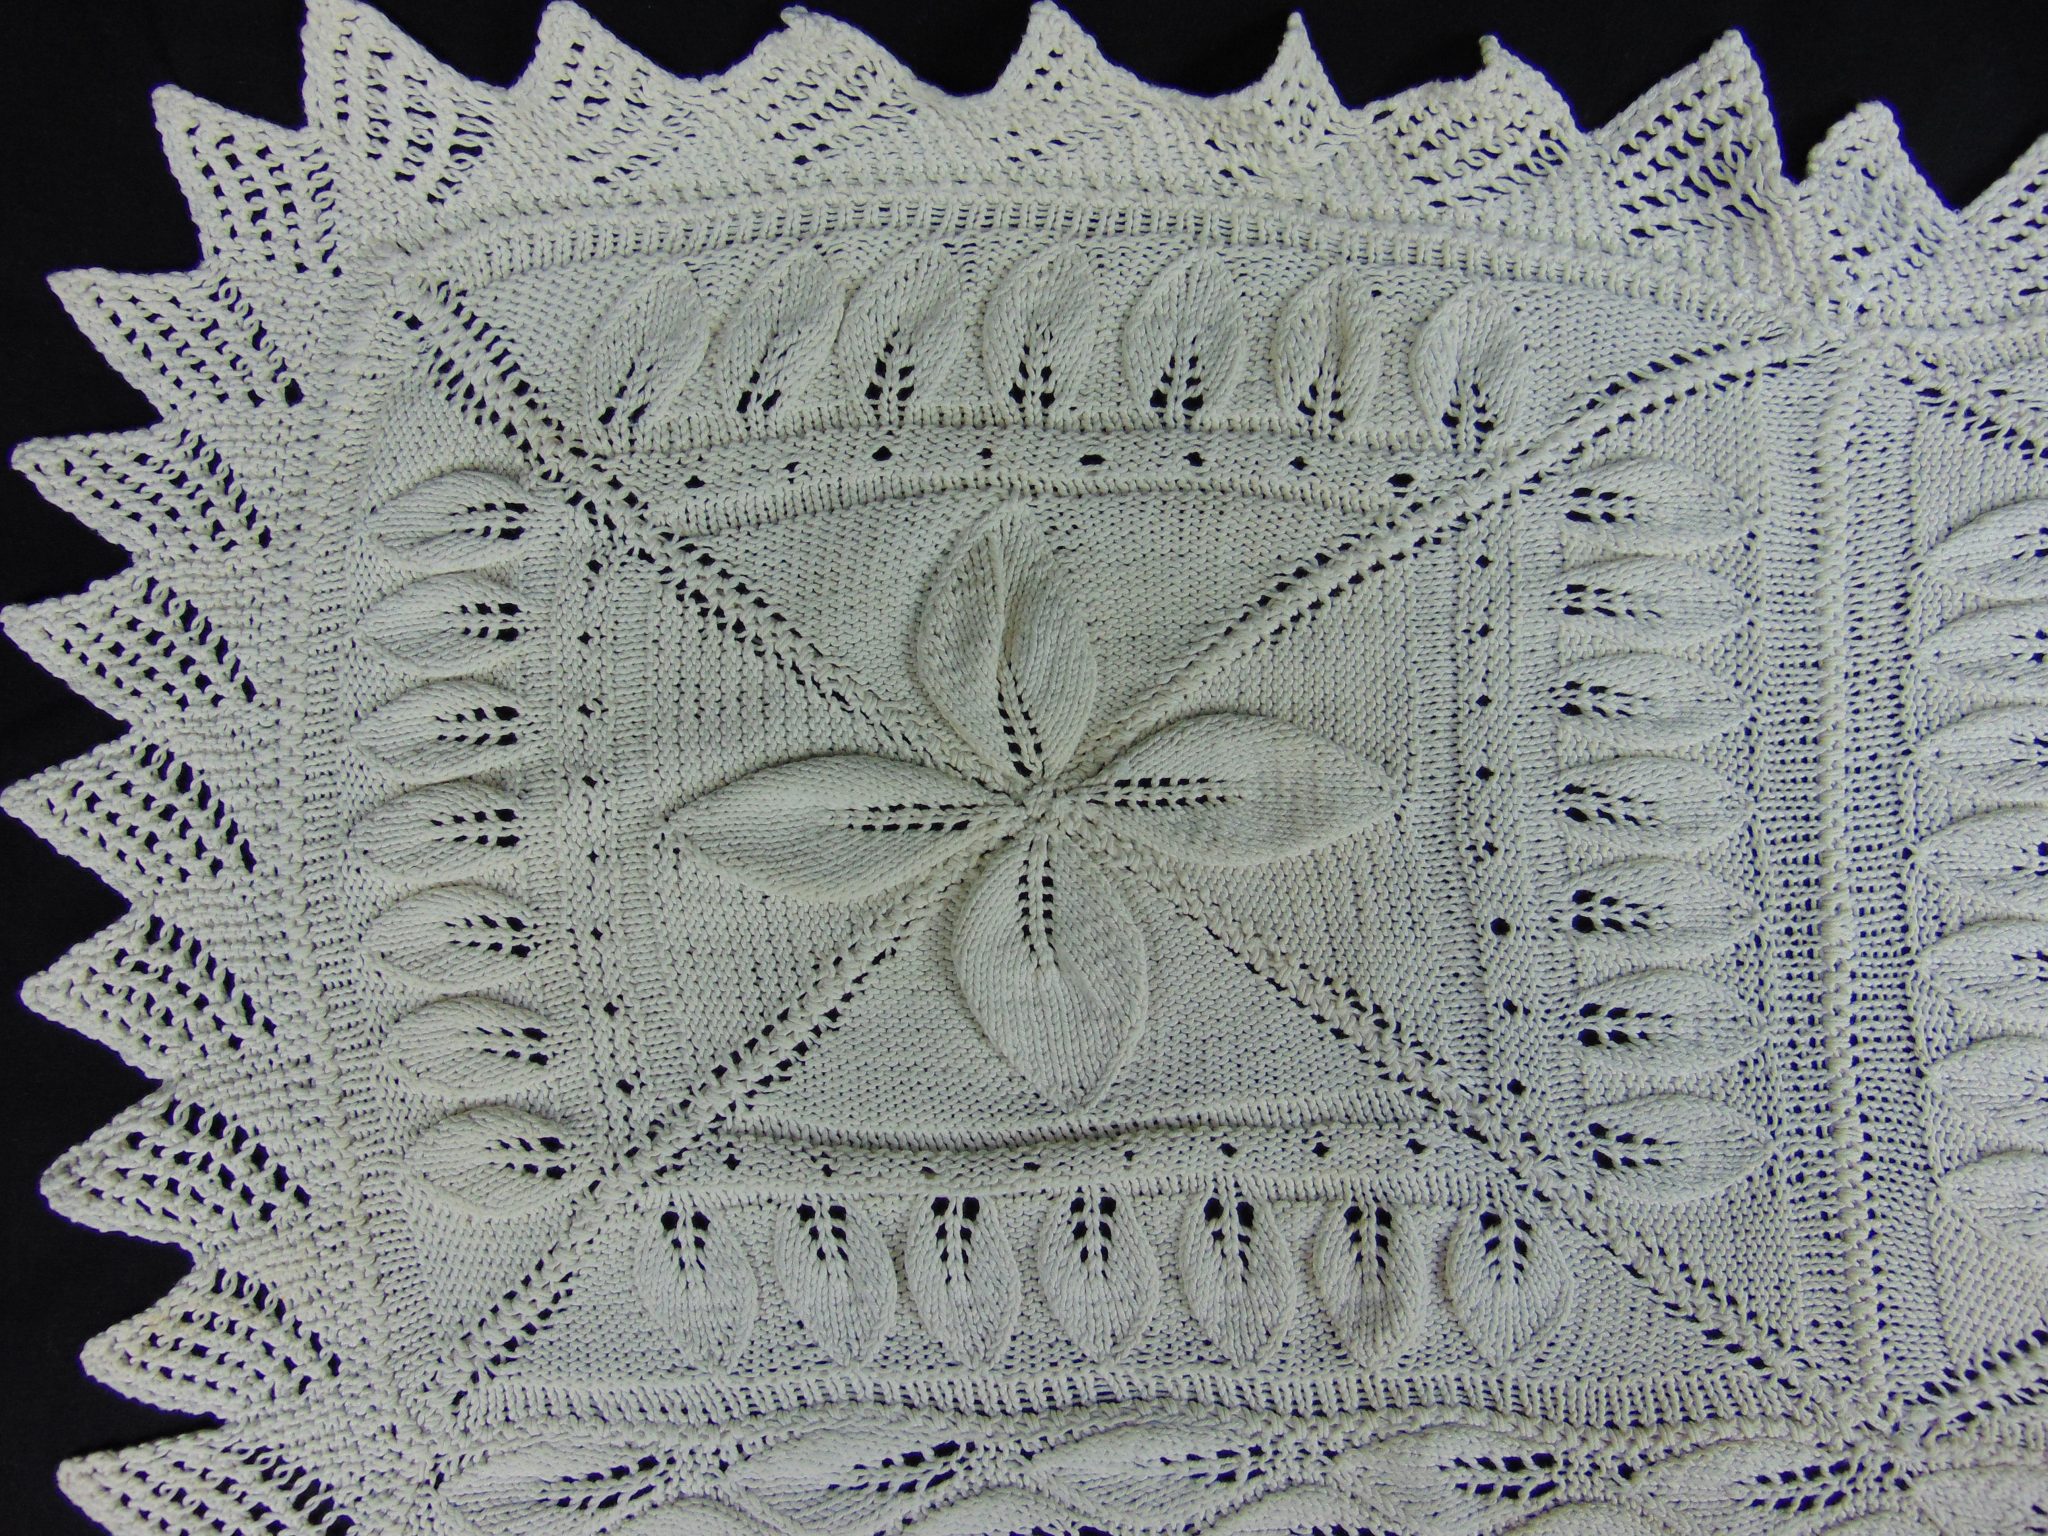
Recreating the pattern of a knit counterpane bureau scarf from the collection of the Huron County Museum and Historic Gaol is a fascinating trip through vintage knitting patterns and traditions.
Counterpanes – white bed coverlets or bedspreads – were quite popular in the mid-1800s and into the 1900s and were traditionally made from white or cream-coloured cotton yarn that was so readily available at that time. The coverlets were also sometimes called quilts and were pieced together, comprised of square or circular motifs for example, in a similar way as a quilt top.
The inspiration. This photo shows the upper-left corner of the original heirloom knit counterpane bureau scarf in the collection of the Huron County Museum and Historic Gaol. (Photo courtesy of the Huron County Museum and Historic Gaol)
The knitted 1890 counterpane bureau scarf in the museum collection consists of three components: 3 squares made up of 4 triangles each, a leaf panel below the assembled squares, and a pointed, saw-tooth edging. The four triangles are knit separately then crocheted together. The squares each measure 12″ by 12″; the leaf panel measures 8″ by 48″.
There are a wide variety of research materials out there for vintage pattern enthusiasts: books, stitch encyclopedias, websites and blogs, magazines, as well as other stitchers, writers and researchers who are also working on pattern recreations.
Recreated counterpane leaf pattern in the form of a pillow.
In all of our research, we were unable to find an exact pattern for the museum counterpane bureau scarf. But, what we did find was a leaf pattern in one book, a triangle counterpane pattern in another, and then a similar edging in another resource. Essentially, we are attempting to reverse engineer the piece, writing the pattern after examining the item, counting the stitches, looking at the placement of the increases and decreases and so on.
After some trial and error, trying various needles sizes and yarn types and weights, we settled on recreating the pattern in locally sourced worsted-weight wool from Steele Wool Farm.
Counterpane Pillow – A Pattern to Knit
The pattern is available for those of you interested in trying it out.
Here’s a link to the free version of Counterpane Pillow pattern readily accessible as a blog post: Counterpane Pillow Pattern.
Please note: If you’d like to purchase a printed version of the pattern, please visit or contact the Huron County Museum at (519) 524-2686. All proceeds from this project are donated to the care of the textile collection at the Huron County Museum.
Re-created counterpane leaf pattern in the form of a pillow.
This pillow pattern is inspired by a white cotton counterpane bureau scarf in the collection of the Huron County Museum and Historic Gaol located in Goderich, Ontario.
Please note: If you’d like to purchase a printed version of the pattern, please visit or contact the Huron County Museum at (519) 524-2686.
A traditional counterpane would have been made in white cotton and constructed from a number of smaller units (squares or octagons, for example) that are worked separately and then joined together to create an overall design or effect. The scarf in the museum’s collection is made up of three leaf square units above a panel of leaf lace and then bordered by the pointed lace edging. Cotton rug warp was used to knit the piece, a common practice at the time. Below are a number of images of the original bureau scarf as well as the reproduction.
The original
Counterpane Pillow – A Pattern to KnitThe inspiration. This photo shows the upper-left corner of the original heirloom knit counterpane bureau scarf in the collection of the Huron County Museum and Historic Gaol. (Photo courtesy of the Huron County Museum and Historic Gaol)
The front of our counterpane pillow features the 4-part counterpane square as does the back of the pillow. The pointed lace edging is a recreation of the original edging on the bureau scarf.
Pattern
FINISHED SIZE This pattern consists of triangles joined together to form a square. Each triangle measures 9” from leaf point to cast-off straight edge. Assembled square measures 18” square, with pointed lace edging, 24” square.
YARN Worsted weight yarn. The sample in the photo was knit with worsted weight yarn from Steele Wool Farm; approximately 3 hanks needed to complete pillow front. NEEDLES Size US 7 (4.5 mm) or size needed to obtain gauge
GAUGE 4 to 5 stitches per inch on a size 7 (4.5mm) knitting needle (gauge is approximate).
NOTIONS Tapestry needle Extra yarn for sewing together 18” pillow form
POINTED LACE EDGING CO 9 sts 1st row: K1, (YO, K2tog) three times, YO, K2 2nd and every alternate row: Knit to end 3rd row: K2, (YO, K2tog) three times, YO, K2 5th row: K3, (YO, K2tog) three times, YO, K2 7th row: K4, (YO, K2tog) three times, YO, K2 9th row: K5, (YO, K2tog) three times, YO, K2 11th row: K6, (YO, K2tog) three times, YO, K2 13th row: K7, (YO, K2tog) three times, YO, K2 15th row: Knit to end 16th row: Bind off 7 sts, K8 Rows 1-16 form pattern. Repeat for desired length.
FINISHING Wash all pieces and lay flat to block, pinning to correct measurements.
CONSTRUCTION For the front and back of the pillow, arrange four triangle units wrong-side up so the leaf corners align at the centre and single crochet triangle units together. Mattress stitch can be used instead of single crochet, but arrange triangles right-side up for this method. Using a whip stitch, sew front and back assembled squares together, leaving one side open for the pillow form to slide in. Slide pillow into place. Sew last side closed or leave open, depending on your personal choice. Attach pointed lace edging around the perimeter of the pillow using mattress stitch. Weave in ends.
ABBREVIATIONS BO bind off CO cast on DEC decrease K knit K2tog knit two stitches together P purl P2tog purl two stitches together RS right side WS wrong side YO yarn over
About the designer
Sharlene Young-Bolen is a Blyth-based knitter with a love & appreciation for all things vintage & handmade. For pattern support or questions, please contact sbolen@stitchrevivalstudio.ca. Irene Kellins is the past owner of Stitches with a Twist, a yarn and sewing shop in the village of Blyth, Ontario. She has had years of experience knitting, crocheting, and sewing, and she especially enjoys instructing others in the needle arts. Irene works out of her home studio in Blyth, Ontario and consulted on this pattern project, helping Sharlene decipher the original piece.
Today on the blog it’s all about a dress recreation project: a dress of many patterns.
I’ve spoken about the idea of recreating a vintage, Edwardian-styled dress from the collection of the Huron County Museum & Historic Gaol. The plan is to recreate the basic pattern of a tea dress using swatches of recreated needlework items. So, it’s a reproduction on two levels: design & construction.
Heirloom 1912 wedding dress and shawl worn by Francis Mason Watson of Blyth in 1912. (Photo used courtesy of the Huron County Museum.)
The dress design will be based on an Edwardian Tea Dress-style wedding dress originally worn by Francis Mason Watson (1890 – 1918) a former resident of Blyth, Ontario. The shawl and dress will be made up of vintage pattern samplers (swatches) based on textile items in the Huron County Museum. Stitchers of all levels and techniques are welcome, beginner to advanced.
The needlework techniques used in the swatches will depend on the skills of the volunteers that take part. If there are tatting experts, for example, tatting reproduction swatches could be worked up and incorporated into the dress.
A visit with 1911 vintage
IA while ago, I enjoyed a visit to the museum and getting a look at the 1911 wedding dress in person. The simply lovely cream-coloured wedding dress dates from 1911. It’s even more beautiful in person – the images give just a hint of its charm. And so you can get a look too, here’s a collection of images of the dress…
The dress’s construction is simple, consisting of basic shapes (rectangles, triangles, and squares) and so would lend itself to a swatch contruction. Portions of the dress have a lovely silky sheen; I can imagine those portions would be lovely knitted or crocheted using a fibre with a sheen to it. Other portions of the dress are matte and would lend themselves to recreation using another fibre, perhaps a fine wool blend.
Let’s stitch some history
Would you be interested in joining in this creative reconstruction project? Needle workers & stitchers of all technique and skill level are welcome to join. The museum has a wealth of vintage textile items (such as knitting, quilting, crochet, embroidery) and you are sure to see a stitched item that would inspire you.
I’ve put together a number of the images of needlework textiles items from their collection. I’ve tried to include examples of crochet, knit, tatting, lace, and embroidery. There are many more textiles in the museum. Have a look at these examples…
Next steps
What do you think? Want to join us and stitch a sampler? The pattern you recreate or create (if you are inspired to make your own version) would then be published as part of a collection, Stitching Our History – a Collection of Needlework Patterns from the Huron County Museum.
Please note all photos are courtesy of the Huron County Museum & Historic Gaol and are used with permission. Thank you to Huron County Museum & Historic Gaol for their support.
A counterpane pincushion, inspired by an heirloom counterpane baby blanket in the collection of the Huron County Museum & Historic Gaol located in Goderich, Ontario.
Do you love stitching from old patterns?
I certainly do. I also enjoy trying to recreate a pattern based upon a stitched item.
This pincushion is inspired by a white cotton counterpane baby blanket in the collection of the Huron County Museum and Historic Gaol in Goderich, Ontario.
White cotton counterpanes (or coverlets) were common in the nineteenth century, as was “white knitting,” due to the preference at the time for white bed coverings and because of the ready availability of cotton yarn.
Counterpanes are made up of smaller units (squares or octagons, for example) that are worked separately and then joined together to create an overall design or effect. They were traditionally knitted or crocheted in white or cream-colored cotton yarn. Patterns were numerous and could be quite intricate.
The heirloom original, the inspiration for the pincushion. A portion of the folded counterpane baby blanket can been seen in the photo. (Photo courtesy of the Huron County Museum & Historic Gaol)
Knitted about 1812, the white cotton counterpane in the museum’s collection is of a simple and lovely design. The blanket was constructed of 3-inch (7.6-cm) square units joined together, forming an overall On Point pattern: the eyelet spaces create the optical illusion of nested diamonds. Each unit is worked from one corner to the opposite corner, with garter stitch in the lower half of the unit, a row of eyelets through the middle, and alternating stockinette-stitch and reverse-stockinette-stitch ribbing above. The garter-stitch rows feature a yarn-over increase at the beginning of each row.
The front of the pincushion features the same overall layout as the museum’s crib blanket. On the reverse of the pincushion, the units are placed so that the yarn-over edges connect to highlight the lovely lace-like effect created when the yarn-overs are joined by a simple whip stitch. The knitted edging is a recreation of the original edging on the crib counterpane.
PINCUSHION INSTRUCTIONS
Pincushion Units
Make 8
CO 2 sts.
Next Row: Yo, k to end—1 st inc’d.
Rep last row 33 more times—36 sts.
P 1 row.
Eyelet Row (RS): K1, [yo, k2tog] 17 times, k1.
P 1 row.
K 1 row.
*Next Row (WS): K1, k2tog, k to end—1 st dec’d.
Next Row (RS): P1, p2tog, p to end—1 st dec’d.
Rep last 2 rows once more—2 sts dec’d.
Next Row (WS): P1, p2tog, p to end—1 st dec’d.
Next Row (RS): K1, k2tog, k to end—1 st dec’d.
Rep last 2 rows once more—2 sts dec’d.
Rep from * 3 more times—4 sts rem.
Next Row (WS): K1, k2tog, k to end—3 sts rem.
Next Row (RS): P1, p2tog, p to end—2 sts rem.
Next Row: K2tog—1 st rem. Fasten off.
EDGING
CO 13 sts
Row 1: K2, [yo, k2tog] 3 times, k1 [yo, k2] 2 times—15 sts.
Row 2: K8, [yo, k2tog] 3 times, k1.
Row 3: K2, [yo, k2tog] 3 times, k7.
Row 4: K8, [yo, k2tog] 3 times, k1.
Row 5: K2, [yo, k2tog] 3 times, k3 [yo, k2] 2 times—17 sts.
Row 6: K10, [yo, k2tog] 3 times, k1.
Row 7: K2, [yo, k2tog] 3 times, k9.
Row 8: BO 4 sts, k6 (including st rem on right needle after BO), [yo, k2tog] 3 times, k1—13 sts rem.
Rep Rows 1–8 until piece measures 25 inches (63.5 cm), ending with Row 8. BO all sts.
FINISHING
Wash all pieces and dry flat to block. For the front of the pin cushion, arrange four units so the ribbing sections align, and sew together using whip stitch. For the back, arrange four units so the yarn-over sides align, and sew together using whip stitch. Weave in ends. Sew front and back pieces together, leaving one side open for stuffing. Fold felted batting in half, fill to desired thickness with fiberfill stuffing, put into pincushion, and sew last side closed. Sew on edging using whip stitch. Sew ends of edging together.
ABBREVIATIONS
BO bind off
CO cast on
DEC decrease
K knit
K2tog knit two stitches together
P purl
P2tog purl two stitches together
RS right side
WS wrong side
YO yarn over
FINISHED MEASUREMENTS
6 inches (15.2 cm) square, excluding edging.
YARN
The sample was stitched with DMC Baroque, 100% cotton thread, bedspread weight, 416 yards (380.4 m)/75 gram (2.6 oz) skein, 3 skeins of White.
NEEDLES
Needles size 0 (2 mm) or size needed to obtain gauge.
GAUGE
36 sts and 72 rows = 4 inches (10.2 cm) in garter st; one unit = 3 inches (7.6 cm) square.
NOTIONS
Tapestry needle
Warm and Natural Felted batting, 6 x 12 inches (15.2 x 30.5 cm)
Warm & Natural Needled Cotton, the Warm Company
Small amount of fiberfill stuffing.