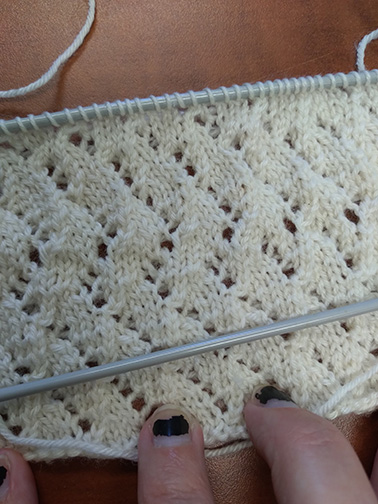
Knitted lace sample swatch, Dress Lace Pattern #1, using Cascade Yarns, Heritage wool and silk blend on size 3mm needles.
I thought it was time to write an update on the Dress of Many Patterns and share my own lace sampler swatch in progress.
The first row of the eight-row repeat staggers the diagonal of eyelets formed; the pattern is worked in multiples of five stitches and an eight-row repeat. The stitch count remains the same – five stitches per repeat – for each repeat of the pattern throughout.
If you’re interesting in trying it yourself, the pattern is below.
Gauge: one 5-st repeat and 8 rows = 3/4 inch wide and 1/2 inch tall.
Dress of Many Patterns – Lace Pattern #1
Using Heritage Silk from Cascade Yarns, CO a multiple of 5 stitches. The swatch in the photograph uses 50 stitches.
A counterpane pincushion, inspired by an heirloom counterpane baby blanket in the collection of the Huron County Museum & Historic Gaol located in Goderich, Ontario.
Do you love stitching from old patterns?
I certainly do. I also enjoy trying to recreate a pattern based upon a stitched item.
This pincushion is inspired by a white cotton counterpane baby blanket in the collection of the Huron County Museum and Historic Gaol in Goderich, Ontario.
White cotton counterpanes (or coverlets) were common in the nineteenth century, as was “white knitting,” due to the preference at the time for white bed coverings and because of the ready availability of cotton yarn.
Counterpanes are made up of smaller units (squares or octagons, for example) that are worked separately and then joined together to create an overall design or effect. They were traditionally knitted or crocheted in white or cream-colored cotton yarn. Patterns were numerous and could be quite intricate.
The heirloom original, the inspiration for the pincushion. A portion of the folded counterpane baby blanket can been seen in the photo. (Photo courtesy of the Huron County Museum & Historic Gaol)
Knitted about 1812, the white cotton counterpane in the museum’s collection is of a simple and lovely design. The blanket was constructed of 3-inch (7.6-cm) square units joined together, forming an overall On Point pattern: the eyelet spaces create the optical illusion of nested diamonds. Each unit is worked from one corner to the opposite corner, with garter stitch in the lower half of the unit, a row of eyelets through the middle, and alternating stockinette-stitch and reverse-stockinette-stitch ribbing above. The garter-stitch rows feature a yarn-over increase at the beginning of each row.
The front of the pincushion features the same overall layout as the museum’s crib blanket. On the reverse of the pincushion, the units are placed so that the yarn-over edges connect to highlight the lovely lace-like effect created when the yarn-overs are joined by a simple whip stitch. The knitted edging is a recreation of the original edging on the crib counterpane.
PINCUSHION INSTRUCTIONS
Pincushion Units
Make 8
CO 2 sts.
Next Row: Yo, k to end—1 st inc’d.
Rep last row 33 more times—36 sts.
P 1 row.
Eyelet Row (RS): K1, [yo, k2tog] 17 times, k1.
P 1 row.
K 1 row.
*Next Row (WS): K1, k2tog, k to end—1 st dec’d.
Next Row (RS): P1, p2tog, p to end—1 st dec’d.
Rep last 2 rows once more—2 sts dec’d.
Next Row (WS): P1, p2tog, p to end—1 st dec’d.
Next Row (RS): K1, k2tog, k to end—1 st dec’d.
Rep last 2 rows once more—2 sts dec’d.
Rep from * 3 more times—4 sts rem.
Next Row (WS): K1, k2tog, k to end—3 sts rem.
Next Row (RS): P1, p2tog, p to end—2 sts rem.
Next Row: K2tog—1 st rem. Fasten off.
EDGING
CO 13 sts
Row 1: K2, [yo, k2tog] 3 times, k1 [yo, k2] 2 times—15 sts.
Row 2: K8, [yo, k2tog] 3 times, k1.
Row 3: K2, [yo, k2tog] 3 times, k7.
Row 4: K8, [yo, k2tog] 3 times, k1.
Row 5: K2, [yo, k2tog] 3 times, k3 [yo, k2] 2 times—17 sts.
Row 6: K10, [yo, k2tog] 3 times, k1.
Row 7: K2, [yo, k2tog] 3 times, k9.
Row 8: BO 4 sts, k6 (including st rem on right needle after BO), [yo, k2tog] 3 times, k1—13 sts rem.
Rep Rows 1–8 until piece measures 25 inches (63.5 cm), ending with Row 8. BO all sts.
FINISHING
Wash all pieces and dry flat to block. For the front of the pin cushion, arrange four units so the ribbing sections align, and sew together using whip stitch. For the back, arrange four units so the yarn-over sides align, and sew together using whip stitch. Weave in ends. Sew front and back pieces together, leaving one side open for stuffing. Fold felted batting in half, fill to desired thickness with fiberfill stuffing, put into pincushion, and sew last side closed. Sew on edging using whip stitch. Sew ends of edging together.
ABBREVIATIONS
BO bind off
CO cast on
DEC decrease
K knit
K2tog knit two stitches together
P purl
P2tog purl two stitches together
RS right side
WS wrong side
YO yarn over
FINISHED MEASUREMENTS
6 inches (15.2 cm) square, excluding edging.
YARN
The sample was stitched with DMC Baroque, 100% cotton thread, bedspread weight, 416 yards (380.4 m)/75 gram (2.6 oz) skein, 3 skeins of White.
NEEDLES
Needles size 0 (2 mm) or size needed to obtain gauge.
GAUGE
36 sts and 72 rows = 4 inches (10.2 cm) in garter st; one unit = 3 inches (7.6 cm) square.
NOTIONS
Tapestry needle
Warm and Natural Felted batting, 6 x 12 inches (15.2 x 30.5 cm)
Warm & Natural Needled Cotton, the Warm Company
Small amount of fiberfill stuffing.
You must be logged in to post a comment.